How to Share Mapillary Captures on Jekyll

 Include a Mapillary sequence into your Jekyll post with MapillaryJS
Static web sites like Jekyll are often used to quickly support and share our posts, like on GitHub or on your own server with basically zero knowledge in web coding. Jekyll's contributors have already made some templates, occasionally with a Google map ready to use. Of course we can customize that with Leaflet or Mapbox, too, if we wish, but here we will focus on the Mapillary part. The rest of the blog framework should keep the same approach with some adjustments - Jekyll is famous for its easy liquid templating and YAML data front matter.
First things to setup
To use the Mapillary API you need to register an application on your Mapillary account. We will use the Client ID later.
 Every field is required and the domain has to be correct
Now, to embed street level imagery we will use MapillaryJS. The whole MapillaryJS is available via CDN here, hosted on "npmcdn". To keep it simple, we will use that solution, but it's possible to use it with "NPM" as well. We may from time to time check back on the version number and update the CDN.
It will also be a good idea to load MapillaryJS only when our post or article needs it. To do that we have to edit our post.html inside the _layouts directory. Edit like the example below, just after the layout front matter. We have to basically copy the CDN script and add an if tag condition relative to the key: value of mapillary: ok inside the post/page front matter.
---
layout: default
---
{% if page.mapillary %}
<!-- Loading Mapillary -->
<script src='https://npmcdn.com/mapillary-js@1.6.0/dist/mapillary-js.min.js'></script>
<link href='https://npmcdn.com/mapillary-js@1.6.0/dist/mapillary-js.min.css' rel='stylesheet' />
{% endif %}
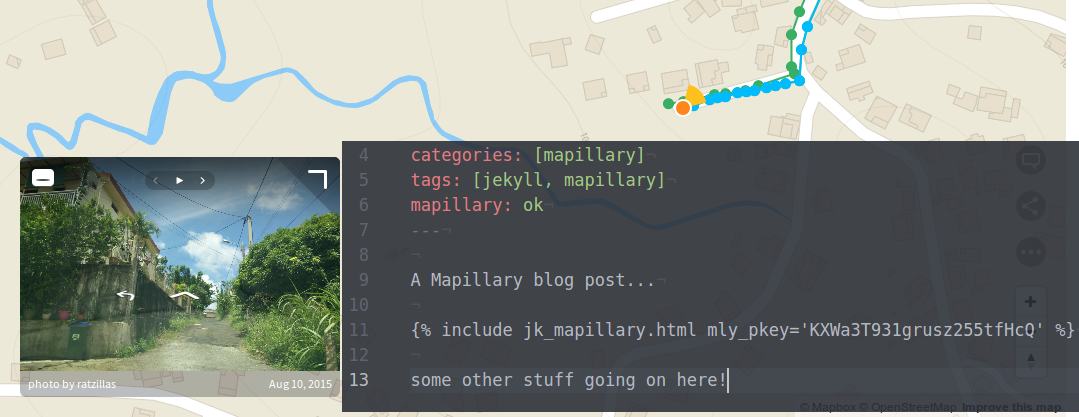
Now MapillaryJS will be loaded every time we add mapillary: ok to the post front matter. We can just paste some html inside our post content to render Mapillary.
---
title:  "Mapillary inside a post"
date:   2016-06-23 13:37:00
categories: [mapillary]
tags: [jekyll, mapillary]
mapillary: ok
---

A Mapillary blog post...

<div id='mly' style='width: 640px; height: 480px;'></div>

<script>
  var mly = new Mapillary.Viewer(
    'mly',
    '<your client id>',
    '<your photo id for initializing the viewer>',
  );
</script>

some other stuff going on here!
Post enhancement
With many sequences to embed, things could get a little tiresome after a while. To maintain readability, our code should blend in as much as possible inside the post. We can drop the client ID straight into the the code, but since this value will not change so often, then why not paste it inside the _config.yml file? With Jekyll we can also use the liquid object { { include } } to call a file from the _includes directory.
Create a new file named jk_mapillary.html in the _includes folder and copy/paste the content below (feel free to customize).
{% if page.mapillary %}
<div id="mly" style='width: 640px; height: 480px;'></div>
{% endif %}>

{% if page.mapillary %}
<script>
var mly = new Mapillary.Viewer(
  'mly',
  '{{ site.mapillary_id }}',
  '{{ include.mly_pkey }}',
  {
    // see options: http://mapillary.github.io/mapillary-js/interfaces/ivieweroptions.html
    "cover": true,
    "renderMode": Mapillary.RenderMode.Fill,
    "basePanoramaSize": Mapillary.ImageSize.Size2048,
    "baseImageSize": Mapillary.ImageSize.Size320,
    "maxImageSize": Mapillary.ImageSize.Size2048,
  }
);
</script>
{% endif %}
A few notes here:
- { { page.mapillary } } will check the key value of
mapillaryinside our blog post/page front matter. - { { site.mapillary_id } } will check the key value of
mapillary_idinside_config.yml. - { { include.mly_pkey } } is special, it's an option of a liquid include object, here our Photo Key aka mly_pkey this time as a needed option when including the Mapillary tag into our post.
We need to include our Client ID inside _config.yml. Replace the mapillary_id: value with your new app Client ID.
mapillary_id: 4m4p1ll4ry1Dk3y42
Don't forget to include mapillary: ok (or any other value you want) into your post/page front matter.
We can find the photo key of our choice on the Mapillary map.
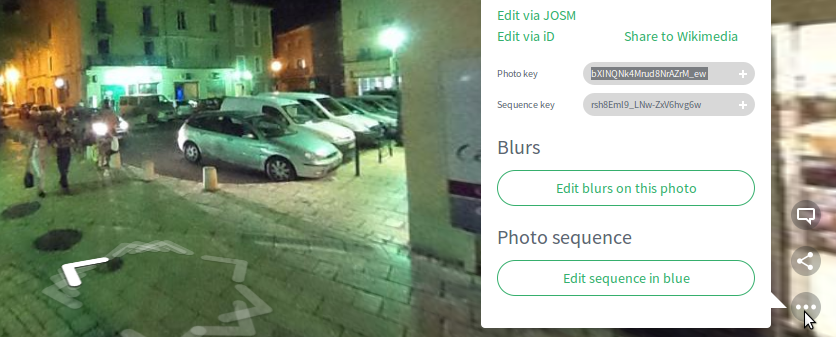 Here is where you find the photo key
And now we have to drop our Mapillary liquid tag inside our post content with the photo key option where it should be rendered inside our post.
---
title:  "Mapillary inside a post"
date:   2016-06-23 13:37:00
categories: [mapillary]
tags: [jekyll, mapillary]
mapillary: ok
---

A Mapillary blog post...

{% include jk_mapillary.html mly_pkey='bXINQNk4Mrud8NrAZrM_ew' %}

some other stuff going on here!
Final render
These last days I was capturing mapillaring on foot with my phone - a castle in France called Le Château de Vincennes. In fact when people saw me with my phone like this, they actually guessed I was capturing stuff but not photo mapping!
See more street-level captures nearby on Mapillary
If you find this nice and interesting to do, you can check/share how to mix it with a map with something of your taste...
- Gist: Mapbox GL JS Map with a simple Mapillary Request
- Gist: Mapbox GL JS Map with multiple Mapillary Requests
- GitHub: more Mapillary examples
Thanks to: @RatZillaS and @zimmy for the first and second picture from their work on Mapillary, and for their inspiration!
This post also appears on Rémi's own blog about Jekyll. You'll also find him on Twitter @remstw.